


Attic ventilation is the continuous movement of air through your home’s unconditioned attic space. Rather than letting air sit trapped beneath your roof deck, a proper system constantly exchanges stale, warm, or moist air inside the attic with fresh air from the outside.
To understand how this dynamic works, it helps to look at basic physics. Attic airflow relies on two natural forces: the thermal stack effect and wind pressure differentials.
- The Stack Effect (Thermal Buoyancy): Warm air naturally expands, becomes less dense, and rises toward the top of the roof structure. As that warm air rises and exits through upper exhaust vents, it creates a gentle suction (negative pressure) near the attic floor. This draws cooler outdoor air through low-level intake vents located beneath the roof eaves.
- Wind Pressure Differentials: As wind blows across your roof, it creates positive pressure on the windward side and negative pressure (suction) on the leeward side and over the ridge line. This natural air pressure difference pulls air through your intake vents and pulls trapped air out through your exhaust system.
According to building science insights on ventilation physics, achieving this continuous flow requires a balanced loop. You must have intake vents to let air in and exhaust vents to let air out. Without intake, exhaust vents cannot move air efficiently.
Summer vs Winter Mechanics and the Importance of Attic Ventilation System Balance
Attic ventilation plays a critical role in protecting your home, but its primary job changes dramatically between the hot summer months and the freezing winters we experience in Southeastern Michigan.
During Michigan summers, solar radiation bakes your roof shingles, transferring immense amounts of heat straight into your attic space. In a home with poor ventilation, the temperature in the attic may eventually reach 140°F on a 90°F day. This trapped heat converts your attic into a massive thermal blanket, radiating heat down into your living spaces and forcing your air conditioning unit to run constantly.
In the winter, the challenge shifts from heat removal to moisture management and temperature equalization. Everyday household activities like cooking, showering, laundry, and even breathing release gallons of water vapor into your living area. This warm air naturally drifts upward through unsealed ceiling penetrations into the cold attic.
When warm, moist air meets cold roof sheathing, it condenses into liquid water. Over time, this condensation dampens insulation, rots wooden rafters, and fosters mold growth. Furthermore, trapped winter heat warms the underside of the roof deck, melting the snow accumulation on top. As that melted snow runs down toward the cold, unheated roof overhangs, it refreezes, creating damaging ice dams. Continuous airflow keeps the underside of the roof deck cold, keeping winter roof snow frozen evenly across the surface.
Key Benefits and the Importance of Attic Ventilation for Homeowners
When your roofing and attic system breathes properly, your entire home benefits. Understanding the importance of attic ventilation means recognizing that a well-designed airflow path protects far more than just your roof shingles—it safeguards your home’s structural framing, indoor comfort, and energy budget.
As detailed in official asphalt roofing technical guidance, proper attic airflow limits high heat buildup and controls humidity levels. When paired with proper ceiling insulation, a balanced ventilation setup keeps your conditioned living space separate from the outside climate elements. If you want to dive deeper into protecting your living space envelope, you can learn how to properly insulate your home alongside installing ventilation components.
Structural Longevity and the Importance of Attic Ventilation in Preventing Moisture Damage
Uncontrolled heat and moisture are the two main enemies of a home’s structural integrity. When superheated air remains trapped inside your attic space during summer, roof sheathing boards expand, warp, and buckle.
Under excessive heat, asphalt shingles deteriorate rapidly. High temperatures accelerate the volatilization of the essential oils within asphalt shingles, causing them to become brittle, lose protective granules, and cup or curl prematurely.
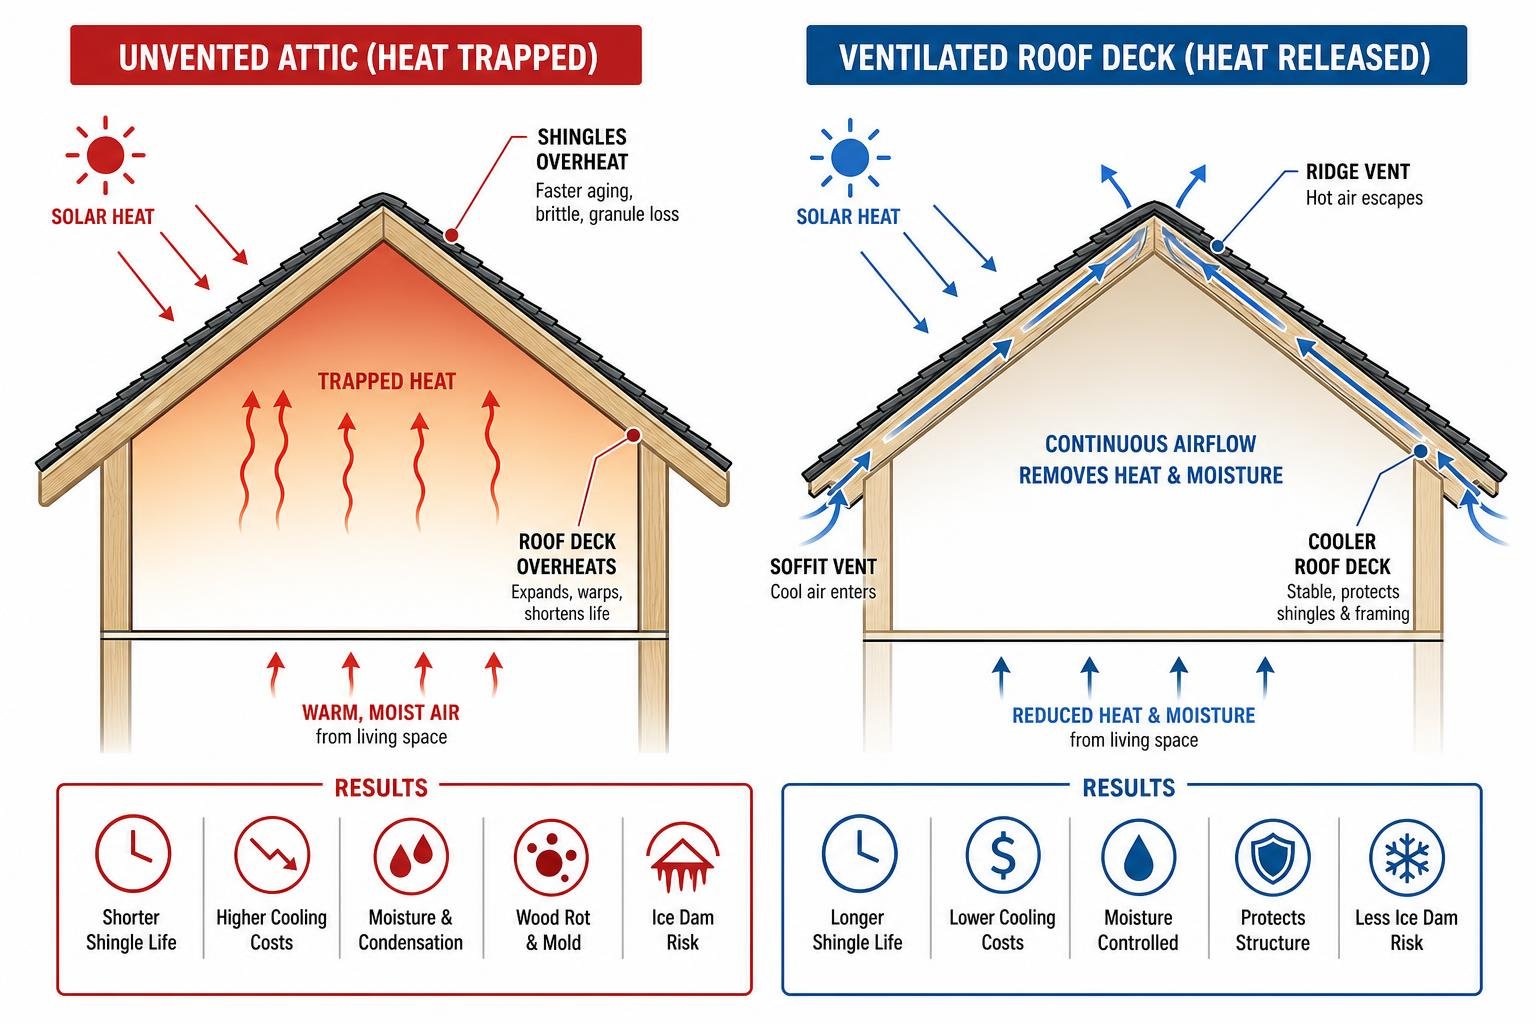
Building science experts frequently reference the Arrhenius equation—a formula detailing how chemical reaction rates double with every incremental increase in temperature—to calculate roof degradation. Applying the Arrhenius equation, a 10 percent reduction in useful service life should be expected for shingles on unvented attics. A 2 to 3 degree F. rise in average temperature is typical for asphalt shingles, with a corresponding 10 degree F. rise in average temperature for sheathing in unvented attics. For a standard 30-year shingle roof, that heat penalty can strip off several years of useful structural protection.
Moisture damage can be even more destructive:
- Roof Deck Rot: Damp plywood or oriented strand board (OSB) sheathing loses structural integrity, causing weak spots where fasteners can pull out.
- Rafter and Truss Fungi: High attic humidity provides the perfect environment for wood-destroying fungi that weaken structural framing members.
- Mold Growth: Mold spores multiply rapidly on wet cellulose or wood surfaces, spreading spores downward into your living spaces and compromising indoor air quality.
Mitigating Winter Ice Dams and Roof Leaks
Homeowners in Oakland County, Livingston County, and across Southeastern Michigan know how destructive winter ice dams can be. An ice dam forms when warm attic air heats the upper sections of the roof deck while eaves and overhangs remain cold.
- Heat rising from your home accumulates in an unvented attic.
- Snow sitting on the upper section of the roof melts into water.
- Liquid water streams down the sloped roof until it reaches the cold overhang or gutter line, where it refreezes into a ridge of ice.
- Subsequent snowmelt gets trapped behind this ice ridge, creating a standing pool of liquid water that backs up underneath the lower asphalt shingles.
Once water slips under your shingles, it seeps into the roof deck, drips into attic insulation, and causes ceiling stains, ruined drywall, and warped wall framing. Proper attic ventilation vents that heat out before it can melt the snow on your roof deck, preventing ice dam formation. If you are already noticing signs of winter leaks or ceiling spots, take time to find local roof repair solutions to fix structural issues before adding new insulation.
Common Types of Attic Vents and Ventilation Standards
To build a complete ventilation system, you need the right mix of intake and exhaust vents suited to your home’s roof pitch, architectural design, and square footage.
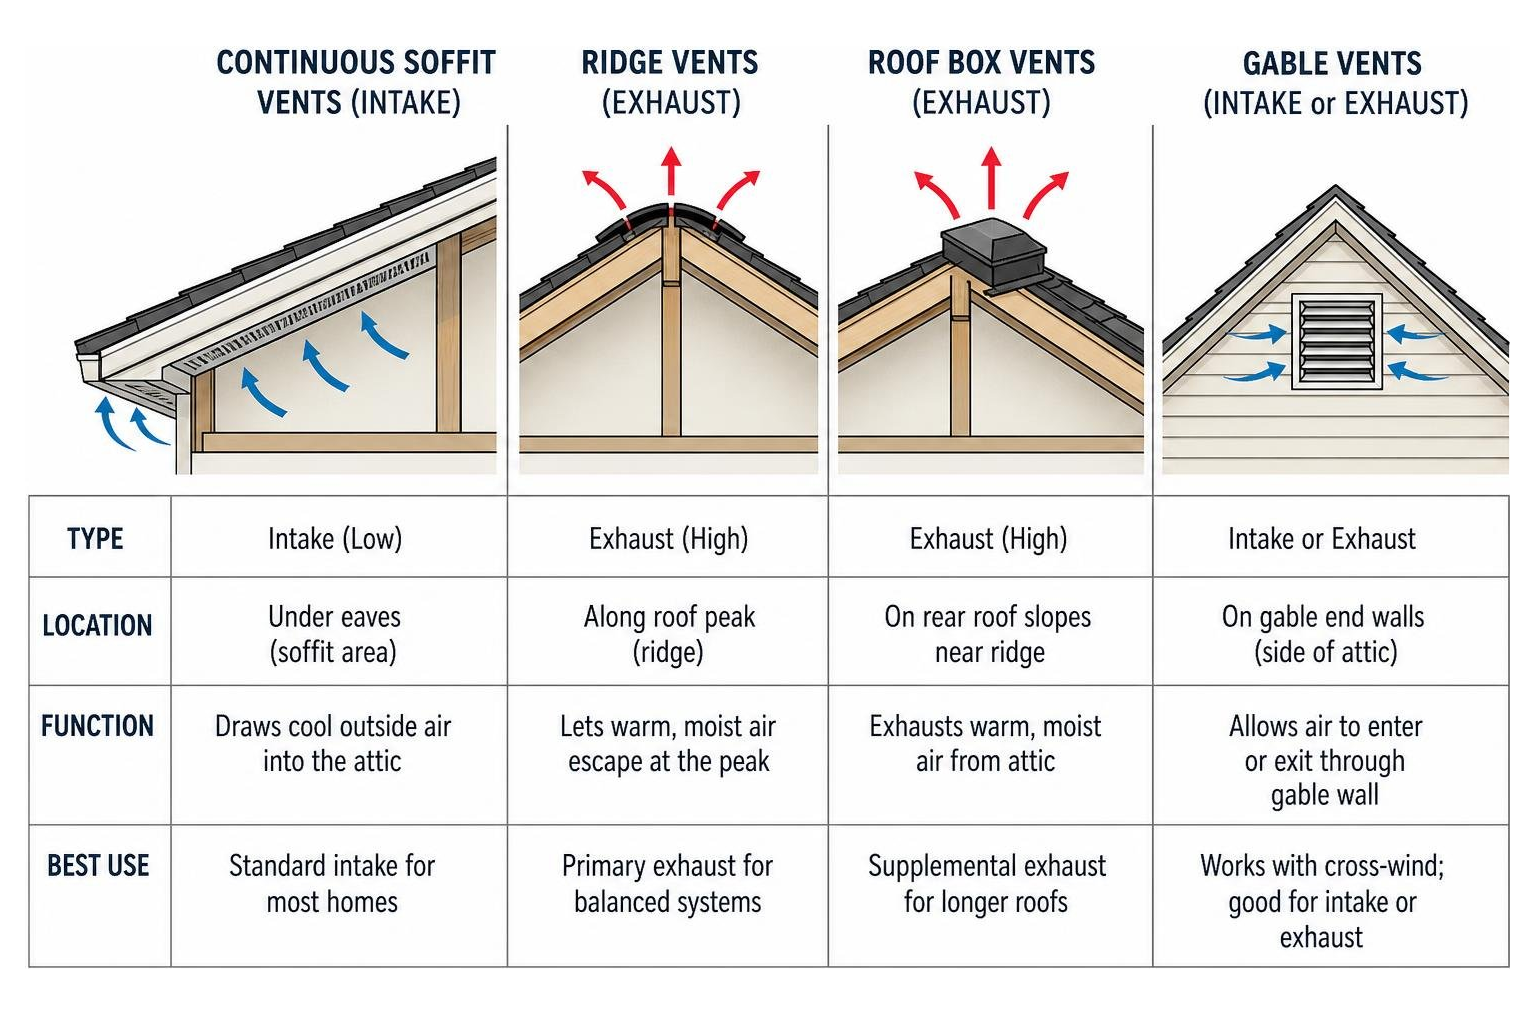
- Soffit Vents (Intake): Installed under the eaves of your home, soffit vents are the standard choice for drawing cool exterior air into the low edge of the attic space. They can be continuous vinyl/aluminum panels or individual perforated vents installed across rafter bays.
- Continuous Eave Vents (Intake): Similar to continuous soffit vents, these long, thin vent strips are placed at the lowest eave edge when narrow overhangs prevent standard soffit installation.
- Ridge Vents (Exhaust): Running along the peak of your roof line, static ridge vents provide continuous, uniform exhaust venting across the entire roof ridge. They offer low visual impact while allowing warm air to escape at the peak.
- Static Turtle Vents / Roof Box Vents (Exhaust): Individual square box vents installed on the rear slopes near the roof ridge. They rely on thermal buoyancy to exhaust warm air from individual roof cavities.
- Gable Louvers (Intake or Exhaust): Triangular or rectangular vents placed on the vertical side walls of an attic gable end. They rely heavily on cross-wind breezes to move air across the space.
- Powered Attic Fans (Exhaust): Electric or solar-powered mechanical fans mounted on the roof line or gable ends to force air out of the attic. While powerful, they must be paired with adequate intake vents to avoid pulling conditioned air from inside your home.
Recommended Ventilation Ratios and Sizing Formulas
Calculating adequate attic airflow relies on determining the Net Free Venting Area (NFVA)—the actual unobstructed square footage of space through which air can pass through a vent screen or louver.
Building codes establish minimum standards for attic ventilation:
- The 1:300 Rule (Standard Code Standard): The U.S. Housing Authority and standard building codes recommend a minimum of at least 1 square foot of attic ventilation (NFVA), evenly split between intake and exhaust, for every 300 square feet of attic floor space. This lower ratio is permitted when an approved interior vapor retarder is present or when upper exhaust placement is well-balanced with lower intake.
- The 1:150 Rule (Enhanced/Cold-Climate Standard): In high-moisture or cold weather areas, attic ventilation recommendations range up to 1 square foot of ventilation for every 150 square feet of attic space.
| Vent Type | Vent Category | Primary Location | Primary Function | Best Paired With |
|---|---|---|---|---|
| Continuous Soffit Vents | Air Intake | Underside of eaves / overhangs | Draws cool, low exterior air into rafter bays | Continuous Ridge Vents |
| Continuous Ridge Vents | Air Exhaust | Along top peak of the roof ridgeline | Expels warm, moist air naturally rising to peak | Continuous Soffit Vents |
| Static Box / Turtle Vents | Air Exhaust | Upper roof slope near top peak | Spot-exhausts hot air from high attic spaces | Underside Soffit Vents |
| Gable Wall Louvers | Intake / Exhaust | Vertical exterior gable end walls | Moves air horizontally across wide attic spaces | Opposing Gable Louvers |
| Powered Attic Fans | Mechanical Exhaust | High roof slope or gable sidewall | Mechanically extracts super-heated air | Ample Soffit Intake Vents |
To calculate your total minimum ventilation needs under the 1:300 rule for a 1,500 sq. ft. attic floor:
- 1,500 sq. ft. / 300 = 5 sq. ft. of total required Net Free Venting Area (720 sq. inches).
- Divide evenly: 360 sq. inches dedicated to low intake vents and 360 sq. inches dedicated to high exhaust vents.
Balancing Air Intake and Exhaust to Prevent System Short-Circuiting
The golden rule of attic ventilation performance is maintaining a 50/50 balance between intake venting and exhaust venting. When possible, building science guidelines recommend leaning slightly toward having more intake capacity (50% to 60% intake vs. 40% to 50% exhaust). Intake should never be less than exhaust.
If your roof exhaust capacity outpaces your soffit intake capacity, your ventilation system will experience negative air pressure. The roof exhaust vents will draw replacement air from the path of least resistance. Instead of drawing air through your soffits, the system can draw cool conditioned air up from your home through unsealed ceiling light fixtures, attic doors, and wall top-plates.
Mixing different types of exhaust devices on the same roof—such as combining continuous ridge vents with static box vents or gable louvers—causes system short-circuiting. Because air follows the shortest path, a ridge vent can pull intake air directly from a nearby box vent or gable wall vent right below it rather than pulling fresh air up from the lower soffits. This leaves the lower regions of your attic unventilated and superheated.
Vented vs. Unvented Attic Designs: Building Science Comparison
While traditional vented attics remain the standard across Michigan homes, modern building science allows for both vented and unvented (conditioned) roof assemblies depending on home design and mechanical equipment needs.
- Traditional Vented Attics: The thermal boundary is established at the flat attic floor using blown-in cellulose or fiberglass batts. Cold outside air travels above the insulation layer, keeping the roof structure isolated from the interior living space. This passive system is economical, highly effective at managing winter roof snow, and simple to maintain.
- Unvented (Conditioned) Attics: The thermal boundary is moved directly to the underside of the roof deck. Continuous rigid insulation boards above the wood deck or closed-cell spray foam applied underneath the roof sheathing seal the attic space from outdoor air. The attic becomes a conditioned space that shares the climate of your home.
Unvented designs are useful when placing air handlers and HVAC ductwork inside the attic space. Leaky ducts inside a vented attic can suffer a 20 percent efficiency penalty due to temperature losses. Unvented designs also offer protection in areas prone to wildfires or severe wind-driven rain, as there are no exterior soffit openings for embers or rain to enter.
However, unvented assemblies must be designed carefully to avoid trapping moisture directly against structural roof members. Building science research shows that applying insulation directly underneath the roof deck causes an average shingle temperature rise of 2 to 3 degrees Fahrenheit, which can slightly reduce shingle lifespan if moisture control is missed.
Before deciding to upgrade or modify your attic space insulation strategy, review detailed federal attic air sealing guidelines. If you are uncertain about the right approach for your home’s setup, take time to explore attic ventilation services near you to speak with local experts.
Best Practices for Installing and Maintaining Proper Attic Airflow
Creating an effective attic ventilation system requires air sealing, proper insulation techniques, and routine maintenance inspections.
- Air Seal the Attic Floor First: Before adding insulation or expanding roof vents, seal all air leaks between your living space and the attic. Seal around plumbing stacks, electrical wiring penetrations, recessed lights, and attic access hatches with caulk or expanding foam. Air sealing stops warm indoor moisture from migrating into the attic cavity.
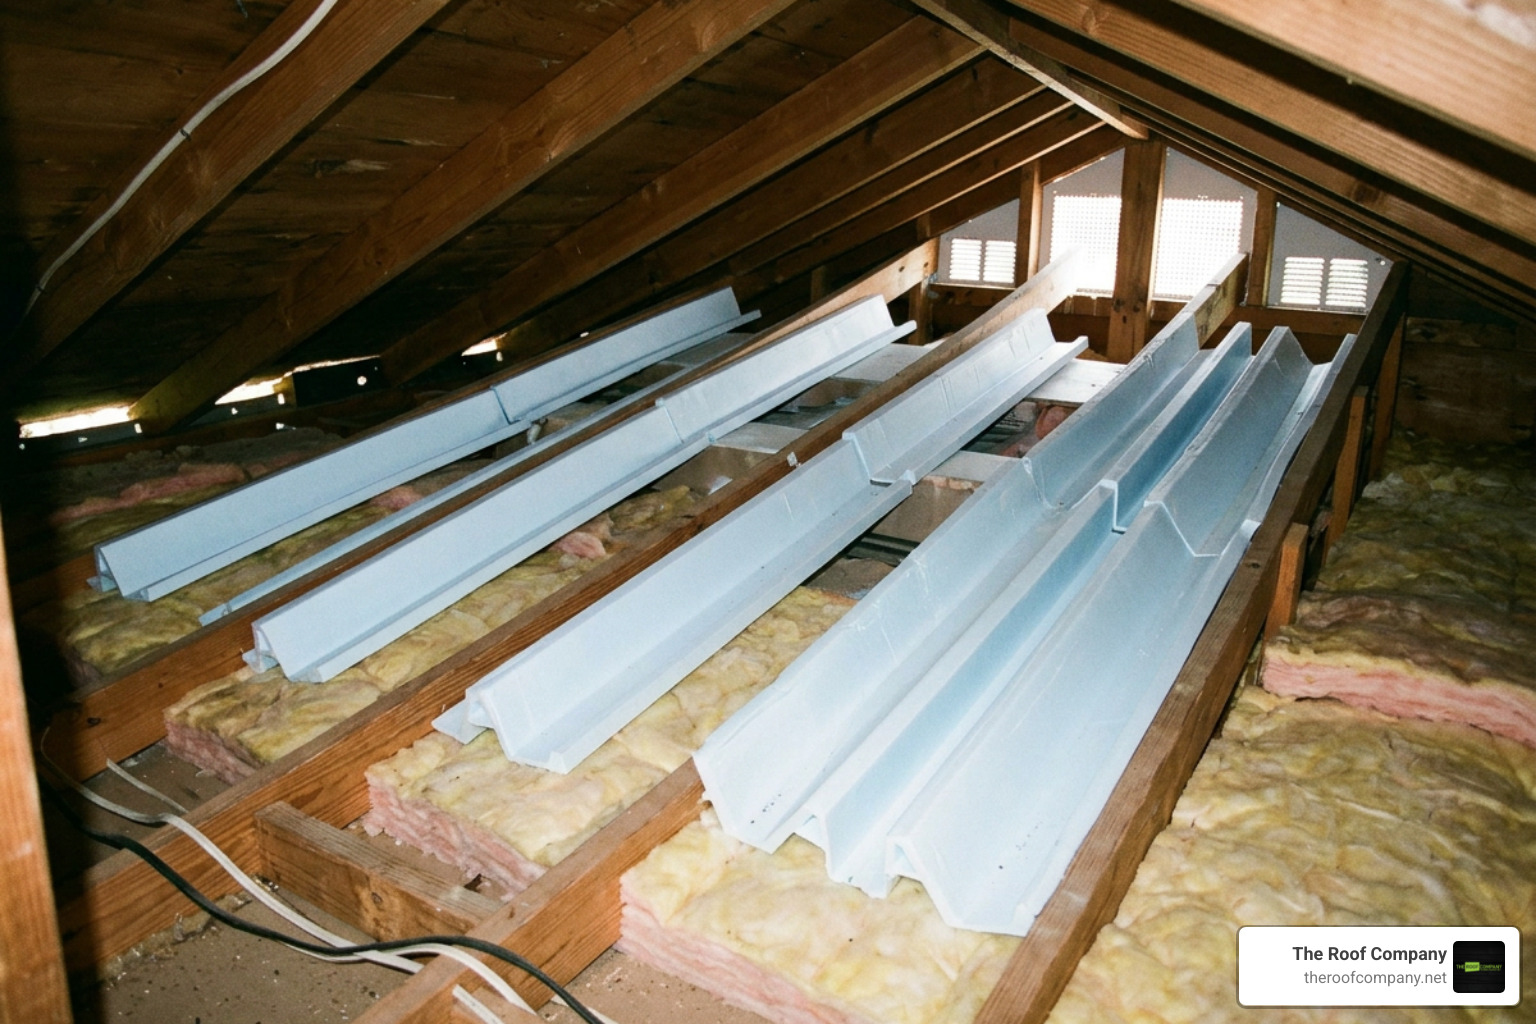
- Install Rafter Vent Baffles (Insulation Dams): Place rigid PVC or foam rafter baffles directly against the underside of the roof deck between rafter spaces at the eaves. Rafter vents create a clear 1- to 2-inch channel for outside air to travel from soffits past the attic floor insulation without being blocked.
- Protect Recessed Can Lights: Keep blown insulation at least 3 inches away from non-IC (Insulated Ceiling) rated light fixtures to prevent heat buildup and fire hazards. Build rigid wire mesh or sheet metal barriers around openings to retain loose insulation.
- Maintain Unobstructed Air Clearance: Never allow loose-fill insulation or fiberglass rolls to spill over the top plates of exterior walls into soffit openings. Place a piece of rigid foam board on the outer edge of the wall top plate as an insulation stopper.
- Inspect soffit vents bi-annually from the ground to ensure house paint, dirt, or dust has not clogged intake screens.
- Check inside your attic once or twice a year for signs of roof deck dampness, wood staining, or sagging insulation batts.
- Ensure bathroom and kitchen exhaust fans vent directly to the outside through roof caps, never dumping humid air into the open attic space.
Frequently Asked Questions About Attic Ventilation
How do I know if my attic has adequate ventilation?
You can spot signs of poor attic ventilation without specialized equipment. During summer afternoons, check if your upper floor rooms feel excessively hot compared to the rest of your house, or touch your ceiling to feel if it radiates heat downward.
In winter, look for ice dams forming along your gutters or frost forming on the underside of your attic roof deck.
Can an attic fan cause problems if soffit vents are blocked?
Yes. If you install a powered attic exhaust fan while your lower soffit vents are blocked by insulation or paint, the fan creates strong negative air pressure inside the attic space.
Instead of pulling air from the outside, the fan will pull air up from inside your home through ceiling light fixtures, wall switches, and attic doors. This pulls cool conditioned air out of your living rooms, forcing your air conditioner to run continuously and increasing your monthly energy bills.
It can also cause backdrafting of combustion gases from natural draft gas water heaters or furnaces located in your basement or utility rooms.
Will proper attic ventilation lower my summer cooling bills?
Proper attic ventilation can help lower summer cooling expenses by preventing superheated air from accumulating in the attic space. When attic air reaches 140°F, heat transfers downward through your ceiling insulation into your living space.
By keeping attic temperatures closer to the outside air temperature, your central air conditioner does not have to work as hard to maintain a comfortable temperature indoors, reducing energy consumption and cooling costs during peak summer months.
Conclusion
Understanding the importance of attic ventilation is essential for maintaining a strong, energy-efficient home. Proper attic airflow works year-round to protect your property:
- Expels solar-heated air during hot summer months to keep attic temperatures under control.
- Extends the service life of asphalt roof shingles by reducing thermal stress and deck movement.
- Prevents structural moisture damage, wood rot, and mold growth caused by winter air leaks.
- Reduces winter ice dam formation along eaves to protect your gutters, ceilings, and walls.
- Improves energy efficiency by taking the strain off your heating and cooling equipment.
Whether you need to upgrade intake soffit vents, balance your roof exhaust capacity, seal ceiling leaks, or replace an aging roof deck, working with an experienced roofing team ensures your home stays protected for years to come.
At The Roof Company, we have delivered straightforward guidance, expert craft, and lifetime guarantees to homeowners across Novi, South Lyon, Oakland County, Livingston County, Washtenaw County, Macomb County, and Wayne County for over three decades. If you are ready to evaluate your attic ventilation system, boost your home’s performance, or schedule a roof replacement, contact our team to schedule professional roof replacement services today.


